Hello, friends! Hope you're all having a great week so far! What an exciting Wednesday! Today I've partnered with nine other amazing DIY and decor bloggers to do
The Great Crate Challenge! Each of us purchased the same exact
crate from Michaels (you can find it
here) and came up with a creative idea for repurposing the crates. I'm
blown away by all of the amazing ideas everyone came up with! You've got to check them out!!!
Wooden crates are great for DIY lovers! There are SO many options on what you can make with them! Plus, they are super affordable.
Michaels often has 40% off coupons, so for around $8 you can craft your little heart out with this crate! Want to see some
amazing crate project ideas? Just keep reading this post and you'll see what my
super creative friends have come up with!
So, what did I decide to do with my crate? As you know, I'm a crazy cat lady. I love my fur babies and want them to have the best of the best, as any fur mom does. However, I do not want to sacrifice my decor for them! It's hard to find cute cat furniture, especially cat furniture that matches your decor, so I'm often trying to come up with my own designs to blend it in and make my cat lady tendencies less noticeable ;) So I decided to make a cat bed. It could work for a cat or small dog, or with a little more work, you could put several crates together for a medium sized animal.
So let's get started, shall we? Here's how I made it...
Supplies:
How to make a pet bed out of a wooden crate:
I purchased my Michaels crate and of course wandered around picking up various things for other projects because how does someone enter Michaels without being inspired to craft more?! So stay tuned for more fun projects! :)
First, I knocked off the top two wood planks with a hammer. Then, I applied my stain to the crate and legs. I let the stain sit for about ten minutes before wiping off the excess.
I ended up using wooden candle holders as legs because I couldn't find small enough furniture legs. I used the candle holders upside down and they worked great!

Next, I did some painting! I decided to try the "white wash" technique because I've never done it before, and I love trying new paint techniques! I used leftover paint from my recent wine cork crate storage project. The American Decor Chalky Finish paint is carried by Michaels in select colors! I'm loving this new line of chalk paint!
The color I used is a grey/beige called "primitive," so I guess this is actually more of a "grey wash" ;)
To white wash, mix 1/3 paint and 2/3 water. My mixture was pretty thin, so I was tempted to add more paint, but I'm glad I didn't! It still covered a lot of the wood texture as you can see in the photo below. With some trial and error, I ended up coating a whole side with my paint mixture, and then wiping away the paint gently with a paper towel in the direction of the wood grain. Worked great!

After completing my white wash, I used wood glue to add my legs. Follow the bottle directions and allow to dry the appropriate amount of time before moving your project.
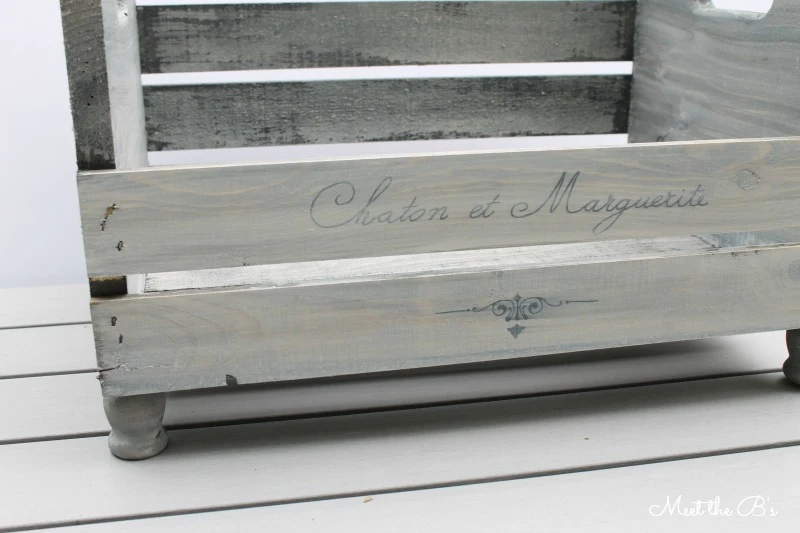
I wanted the crate to fit into our French country/modern rustic decor. I speak absolutely zero French, so I used Google Translate to look up my cats' names in French!! Their names are Kitten (yes, really, Kitten) and Daisy which translated to "chaton" and "marguerite." The fluorish under the text is from a design by The Graphics Fairy.
I used my easy font transfer technique and permanent marker to transfer my design to the crate. See my transfer page for all the steps! The font I used here is called "volutes."
I thought the letters should look faded to make the crate look older, so I brushed one more coat of white washing over the text.
Last, I folded up a big fuzzy blanket, and put it the crate. Easy!
Now I just need to catch one of them sleeping in it on camera!!! :)
Ready to check out the other incredible crate projects? See below!!!


Nicole, this is seriously too cute. If my dog wasn't 60 pounds I would totally make him one haha. And I love the color of your crate. The gray and white wash looks fantastic. AMAZING JOB!
ReplyDeleteThank you so much, Bre! Ha, at 60 pounds he might need a bigger crate ;)
DeleteHow adorable, Nicole! So creative. I am totally going to make one for my kitties now! I have a cat named Kitten, too! LOL!
ReplyDeleteOh my gosh! I love that you have a cat named Kitten too!!! :)
DeleteWhat a creative idea!!! I would've never thought to knock off the top boards like that. And the candle holders for legs?? Genius! Awesome Job, Nicole!! :)
ReplyDeleteThank you Christina!
DeleteSO creative Nicole! LOVE the whitewashing and super fun to add their names in French!!!
ReplyDeleteThanks, Kristi! Thank goodness for Google Translate ;)
DeleteThis is perfect, Nicole! So cute!! We used the exact same paint and color but two totally different looks! Love the technique you used and the stencilling! Great job, friend!
ReplyDeleteKendra @ www.joyinourhome.com
Thanks! I love how different our projects turned out using the same supplies!
DeleteOh my gosh, Nicole! I love this!! If I had a little kitten, I would want an adorable bed like this for it, too! Two other things: (1) I love the whitewash technique. I am going to try it; and (2) love the Sharpie text technique. I will try that too! Thanks for the inspiration!
ReplyDeleteThanks, Bre! Definitely give the text technique a try! I use it all the time now!
DeleteSo cute, Nicole! Love how you looked up your kittens name in French and placed those names on the crate. I bet your cats love their new bed :)
ReplyDeleteThank you, Tara! They love that they have their own spot in the living room now!
DeleteThis is absolutely genius and something I definitely want to do with some crates I have! I'd love it if you shared this over at The Makers link party going on at my blog, UpcycledTreasures.com. Hope to see you there!
ReplyDeleteThank you, Katie! Crate projects are so fun!
DeleteAwww, this is so adorable and the perfect size for my kitties! I can totally see them lounging in this all day (man, the life of a cat!) Love the white wash and your text transfer technique is beyond brilliant!!
ReplyDeleteThanks, Erica! I totally envy my cats' lazy lifestyle too ;)
DeleteThis is so neat! I love crates and this is a great way to refurb them! I am so glad I joined the link party today and saw your post. Cant wait to browse around your blog and pin some fun things! if you get a free second come check out my new blog http://www.liverandomlysimple.com :)
ReplyDeleteThank you for stopping by! :)
DeleteGreat job!!! All of these crate ideas are great!!! I know yours if for cats but a small dog would love it too.
ReplyDeleteThank you! It would be perfect for a small dog too! My mom has two small dogs and wants me to make her one!
Deleteso cute! I don't have a cat or dog, but I bet my boys would love this as a reading seat.
ReplyDeleteThank you, Havalah! A reading seat is a GREAT idea!!!
DeleteI love this, so cute!
ReplyDeleteThanks, Leigh Anne!
DeleteSo sweet! Any chance it would fit my 60 pound pup? I think I'll need a bigger crate... Pinning it from the Pin Worth Wednesday Link Up :)
ReplyDeleteThanks! Maybe a pallet would work better for your pup ;)
DeleteThis is so cute! Great idea for a crate! Thanks for sharing with us at Your Designs This Time!
ReplyDeleteEmily & Erin
This turned out great! I am in love with that stain/paint technique. I think my cats are jealous their mommy hasn't made them a bed--even though I'm sure they wouldn't use it anyway ;) Good job!
ReplyDeleteThis is gorgeous what a great idea to have a crate challenge! Thanks for linking up to Pin Worthy Wednesday, I have pinned your post to the Pin Worthy Wednesday Pinterest Board and you have been FEATURED!
ReplyDeleteThank you for linking up to Pin Worthy Wednesday, your post was beyond Worthy and you have been Featured!
ReplyDeleteAs a featured poster you have the opportunity to join our Pinterest Group Board. To do this send me the email address associated with your interest and follow the Pin Worthy Pinterest Board at http://www.pinterest.com/bajantexan
Head back to http://www.bajantexan.blogspot.com to see your feature and to grab the 'I've been featured Button'.
Congrats again!!
Love this idea- where did you find the Candle holders?
ReplyDeleteI bought the candle holders at AC Moore, but I have seen them at several different craft stores! You could also use furniture legs (sold at craft stores and home improvement stores), but I couldn't find any small enough!
DeleteHow cute. My kitty has beds it's my 60 pound baby girl the size of a female lab who is lacking her own bed. She destroyed her original. The foam now sits covered on the window seats and in pillowcases in the wicker chairs. I reuse everything I can. I wonder if I joined two crates together if that would work. I believe we will soon be finding out. I feel guilty.
ReplyDeleteI'm in love with this fantasticly cute crate make-over. I'll be featuring this on an upcoming crate feature I'm going to be writing. Thanks for the lovely inspiration.
ReplyDeletexoxo,
Sarah @ Backwoods Babies
This is such a fabulous idea, and I will be featuring it over at http://backwoodsbabies.com I love how this turned out, and it would also work for a dolly bed too.
ReplyDeletexoxo,
Sarah @ Backwoods Babies
Absolutely fabulous job. I must make one for our dog. Lovin it!
ReplyDeleteThank you! I hope your dog enjoys it! :)
DeleteWow! So cute! I really like this diy project. I'll try for my little dog.
ReplyDelete