Hi, friends! It's the second Wednesday of the month, which means it's Monthly DIY Challenge time!!! This month my friends and I worked with 1 x 2 lumber to bring you eleven creative project ideas for your home!
I've been trying to find a pet feeder for ages, so this was the perfect opportunity to make my own. Now that we have a little one running around who thinks eating cat food is a good idea, it will be so helpful to be able to quickly pick up the entire feeding station instead of picking up individual bowls. Now, getting the cat food out of his reach is quick and easy. And it even matches our new kitchen decor!
This post contains affiliate links for your convenience. For more information, see my disclosure policy.
We started with a 1" x 12" board. This was actually scrap wood we had in the garage. We could probably have been able to make a 1" x 8" board work without all of the extra cutting, but why not use what you have? We measured and marked our board down to 8.5" x 16" and then used a circular saw to cut the board. We chose this size based on laying the two bowls on the board and playing with spacing until we had it just right.
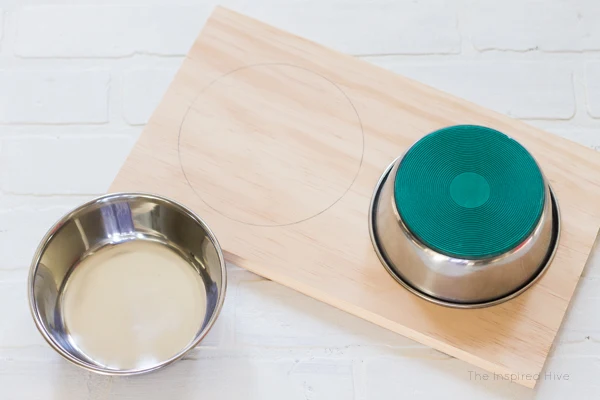
Once cut to size, we laid the bowls upside down on the board in the position we wanted them. We used a pencil to trace their outline. Then, we used a jig saw to cut the holes. We used a drill to create a starting point at the edge of the circle and then carefully moved along the inside edge of the outline. The jig saw will naturally want to go straight, so it's important to follow the circle carefully and keep adjusting the angle. You can get a smoother circle with a router, but if you go slowly, a jig saw will work just fine.
Once you are done with all of the cutting, give all of the edges a quick sanding.
Next, we stained the board with my favorite stain. I love how the stain picked up the marks from the jigsaw adding to the rustic look.
While that was drying, we worked on the base. Truthfully, when I envisioned this project, I wanted some farmhouse style "x" legs on the sides, but when playing around with the design, I realized it would be too tall for my kitties. So, I played with a few other ideas, tested the height out on our cats, and ultimately decided to use a 1x2 along the front and the back as a base.
We used the circular saw to cut the 1x2s to the same length as the stained board.
Then, we gave the 1x2s a few coats of flat black spray paint. Tip: use a tabletop spray shelter to keep the spray paint mess under control.
Once everything was dry, we put the feeding stand together. We used our awesome brad nailer (seriously my fave tool ever) to attach the 1x2's to the stained board from the bottom. Brad nails come in several different sizes, so make sure you purchase nails that won't go all the way through the top of your board.
Last, we nestled the stainless steel bowls into their spots! When shopping for bowls, make sure they have a lip to keep them from falling straight through the holes in the wood ;)
Now for the big test... cat approval...
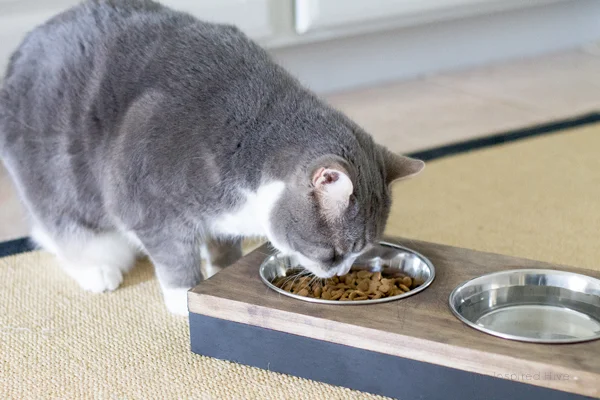
One of our two cats wasn't up for modeling today, but this guy loves food more than anything and was happy to chow down for a photo session. I think he approves!

I've been trying to find a pet feeder for ages, so this was the perfect opportunity to make my own. Now that we have a little one running around who thinks eating cat food is a good idea, it will be so helpful to be able to quickly pick up the entire feeding station instead of picking up individual bowls. Now, getting the cat food out of his reach is quick and easy. And it even matches our new kitchen decor!
This post contains affiliate links for your convenience. For more information, see my disclosure policy.
Materials:
- 1" x 2" boards
- Pine board (we used a 1" x 12" board and cut it to size)
- Circular saw
- Jig saw
- Wood stain
- Spray paint
- Brad nailer
- Pet food bowls (2)
How to make your own pet feeder:
First of all, confession.. my wonderful husband helped me a lot with this project because I haven't been feeling very well due to our little bun in the oven! Thankfully, he loves an excuse to play with powertools, so it worked out well ;)We started with a 1" x 12" board. This was actually scrap wood we had in the garage. We could probably have been able to make a 1" x 8" board work without all of the extra cutting, but why not use what you have? We measured and marked our board down to 8.5" x 16" and then used a circular saw to cut the board. We chose this size based on laying the two bowls on the board and playing with spacing until we had it just right.
Once cut to size, we laid the bowls upside down on the board in the position we wanted them. We used a pencil to trace their outline. Then, we used a jig saw to cut the holes. We used a drill to create a starting point at the edge of the circle and then carefully moved along the inside edge of the outline. The jig saw will naturally want to go straight, so it's important to follow the circle carefully and keep adjusting the angle. You can get a smoother circle with a router, but if you go slowly, a jig saw will work just fine.
Once you are done with all of the cutting, give all of the edges a quick sanding.
Next, we stained the board with my favorite stain. I love how the stain picked up the marks from the jigsaw adding to the rustic look.
While that was drying, we worked on the base. Truthfully, when I envisioned this project, I wanted some farmhouse style "x" legs on the sides, but when playing around with the design, I realized it would be too tall for my kitties. So, I played with a few other ideas, tested the height out on our cats, and ultimately decided to use a 1x2 along the front and the back as a base.
We used the circular saw to cut the 1x2s to the same length as the stained board.
Then, we gave the 1x2s a few coats of flat black spray paint. Tip: use a tabletop spray shelter to keep the spray paint mess under control.
Once everything was dry, we put the feeding stand together. We used our awesome brad nailer (seriously my fave tool ever) to attach the 1x2's to the stained board from the bottom. Brad nails come in several different sizes, so make sure you purchase nails that won't go all the way through the top of your board.
Last, we nestled the stainless steel bowls into their spots! When shopping for bowls, make sure they have a lip to keep them from falling straight through the holes in the wood ;)
Now for the big test... cat approval...
One of our two cats wasn't up for modeling today, but this guy loves food more than anything and was happy to chow down for a photo session. I think he approves!
Check out 10 other ideas using 1x2's:
Pin it for later:


Great minds think alike ;) Love this little feeder for your kitty!
ReplyDeleteWhat a great idea, Nicole! And looks like Kitty approves!! (And love how it matches your beautiful kitchen!!)
ReplyDeleteIt's absolutely genius Nicole!!!
ReplyDelete