It's week three of the Spring 2017 One Room Challenge hosted by Calling It Home, which puts us just about halfway through our bathroom renovation! (Check out our design plans if you missed them!) It's been a crazy busy week around here. We've been working hard on the bathroom, but we were also out of town for the Easter holiday weekend. In addition, my little sister's bridal shower and bachelorette party are this coming weekend, and I'm her matron of honor, so I've been very busy this week wrapping up all of the last minute details. I can't wait to celebrate with her! So, as you can imagine, this week was not our most productive one for the ORC, but we did manage to check a few things off our list!
This post is sponsored by M-D Building Products. As always, I only recommend brands I love and think you'll love too!
This post may also contain affiliate links for your convenience. For more information, see my disclosure policy.
This post may also contain affiliate links for your convenience. For more information, see my disclosure policy.
Week Three Progress:
After the plumbing issues we fixed last week for the sink, this week's main focus was on the beadboard and vanity. In order to get the new vanity installed, the beadboard had to go up first. We bought short 32" pieces so that they would fit in our car, cut them to size with a circular saw, and butted them together. Beadboard is easy to install with a brad nailer (this one is my favorite). As you can see in the photos below, I still need to use some wood filler on the seams and nail holes, and then we need to install the top piece of trim. We installed part of the floor moldings but still need to finish the piece that goes behind the toilet.
Once the beadboard was up, we were able to install the vanity. Thankfully, this one has an open back, unlike the one we removed, so it was wayyyy easier to deal with. No cutting out holes for plumbing. After last week, this is something I'll be looking for if I ever have to buy another vanity in the future! With the vanity in position, we installed our new sink faucet and attached the p-trap and the rest of the plumbing below. We had originally planned on keeping the old one since we decided to stick with chrome fixtures, but once we fell in love with this vanity, we had to pick a centerset faucet instead. I love this one just as much, and did I mention, yayyyyyy, we have running water!!! Let's be serious, that is definitely the highlight of this week!
Don't mind the top of my head creeping in the corner in the photo above. You don't always get to see the not-so-glamorous life of home decor bloggers behind the scenes. Well, here's what real life looks like... Just imagine a super pregnant lady trying to squat in the shower to get out of the mirror's view, holding an umbrella light in the air while trying to take a photo on the tripod that's sitting between her legs all at the same time. And please try not to laugh. Okay, you can laugh a little. But seriously, photographing small spaces is no joke (especially not with a 32 week belly!) and you would be amazed at the positions your favorite bloggers can get into to get a shot! 😂
Okay, back to the bathroom. Having the vanity installed makes it so much easier for me to imagine what the final space is going to look like, and I lovvvvve it!!! This vanity fits our style so much better than the old one, and it takes up so much less space yet somehow has more storage! Win!
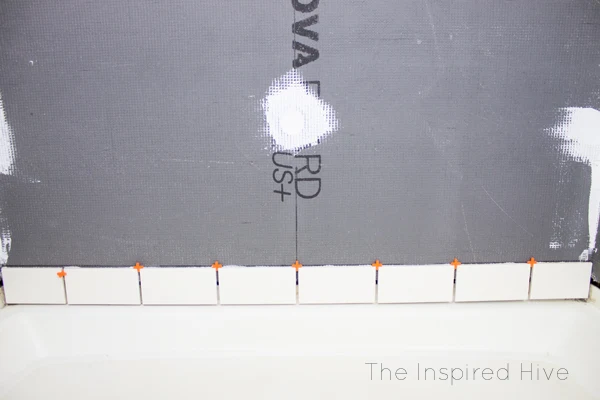
Once we got that done, we were able to finally start tiling the shower. We've both helped out with previous tiling projects, but never on our own, and never on a wall. So before beginning, we consulted our contracting buddy that helped us out with plumbing last week and my husband's dad who has tiled what seems like a zillion showers in his life (I think the need to be constantly doing projects runs in both sides of our family 😉) to get some advice. What we learned is that the bottom row of tile is the most important row! It's vital that the first row is completely set so that the weight of the rest of the tile on the wall doesn't shift and cause things to become unlevel leading to ugly uneven grout lines along with other complications. Makes perfect sense when you think about it.
So, we whipped out our new tiling tools from M-D Building Products and got to work! M-D makes this really handy tiling kit that comes in a bucket and includes everything you need for tiling projects (available at Home Depot, Amazon, or Menards). I'll go into more detail on everything that's included soon when I share the tiling tutorial, but here's a peek at what's inside.
We started our first row of tile on the back wall to keep things nice and centered. We let that wall set before doing the side walls.
Then we moved on to the side walls. Our thin-set mortar said to wait 24-72 hours before beginning the rest of the tile. We decided to wait 48 hours, which means we started yesterday, but you'll just have to wait until next week to see how it's going! 😊 And stay tuned for a full tutorial on how to tile your own shower soon!
Bathroom Makeover To Do List:
Remove tile backsplashRemove countertop and vanityInstall beadboard(still need to fill gaps, paint, add trim)Install new vanity and sink faucetRemove glass shower doorRemove shower tile and old cement boardInstall PROVA BOARD PLUS+- Install new subway tile and grout
Remove tile wall moldings- Install and paint wooden floor moldings/trim
- Update floor grout color
- Paint walls
- Update light fixture
- Accessorize
Check back next week to see our progress, and don't forget to swing over to Calling It Home to see the rest of the One Room Challenge makeovers! Everyone is making such great progress!
Big thanks to our sponsors! They are a great source for all of your tiling projects!
In case you missed it...
Week Four | Week Five | Week Six


This is looking great! I love the color of the vanity you chose. We also installed a new sink this week. And the light! I think we bought that one as well-- Lowe's??? Thank you for sharing!
ReplyDeleteYou guys are cruising right along! Love the new vanity!
ReplyDeleteThe beadboard looks great and the tiles are starting to come along nicely! What you said about the open-back vanity makes so much sense, however I got one last year and the Husband still drilled a hole through the bottom to get the plumbing in... so as long as you use it properly it is so much more convenient :) Hope the rest of the tiling turned out well!
ReplyDelete