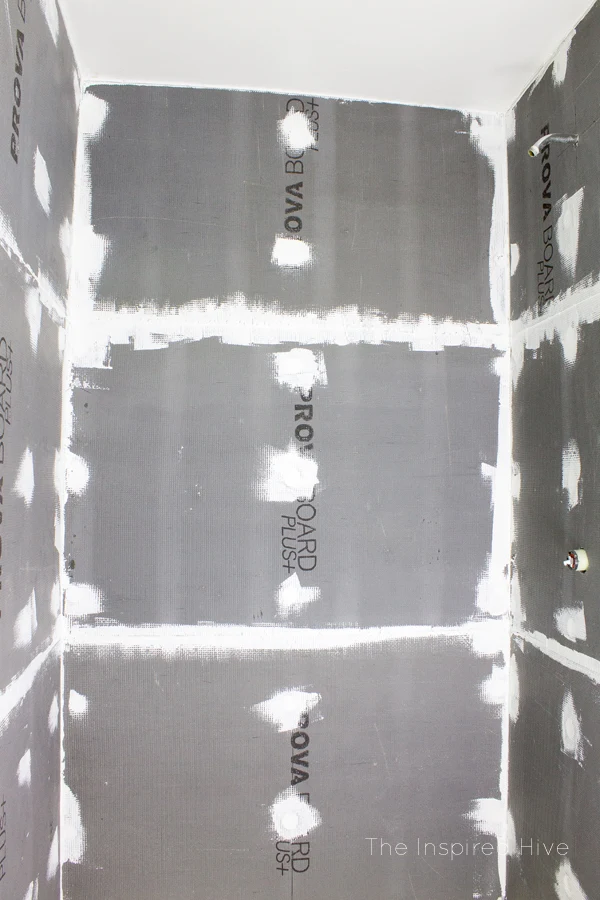
Many of you who were following along for our recent bathroom makeover for the One Room Challenge were curious about the method we used for waterproofing the shower, and today I'm sharing all of the details! Since I am in my third trimester of pregnancy, we wanted this project to be as easy as possible. We found that using PROVA BOARD PLUS+, a lightweight and waterproof tile backer, would be way easier and faster to install than the traditional cement backer board method.
This post is sponsored by M-D Building Products.
This post also contains affiliate links for your convenience.
For more information, see my disclosure policy.
M-D Building Products | PROVA Products
This post also contains affiliate links for your convenience.
For more information, see my disclosure policy.
M-D Building Products | PROVA Products
PROVA BOARD PLUS+ also has a lot more to offer than standard cement board. When we removed our old tile to reveal the existing cement board, it was disgusting. There were several areas of mold and mildew. PROVA BOARD PLUS+ is completely waterproof and vapor tight, so there is no need to worry about all of that moisture damage down the line. It also comes with a ten year warranty, giving you even more peace of mind. (FYI, PROVA BOARD PLUS+ can be used for other tiling projects like countertops, backsplashes, and tub surrounds too!)
We chose to use our existing shower pan because it was still in good shape, however, if you prefer a tiled shower floor, PROVA Products also makes a great shower kit that includes pans, curbs, and waterproof membranes to create a fully waterproof shower floor. There are also extension kits to accommodate larger showers.
We were really impressed with how quick and easy it was to cut and install the PROVA BOARD PLUS+. There is a great, quick animated video on the PROVA Products website that will give you a general idea of the installation process, and I'm sharing all of the details in more depth below!
Materials:
- PROVA-SEAL
- PROVA FASTENERS
- PROVA BOARD PLUS+
- Box knife
- Tape measurer
- Carpenter's square
- Drill
- Hole saw
- Caulk gun
How to install PROVA BOARD PLUS+:
1. Remove any existing tile, walls, cement board, etc. We used a crow bar and hammer for this. If you will be using your existing shower pan, be sure to protect it. We layed down cardboard and old towels. This kept the shower pan from being damaged and also made clean up easier. (Note in the photo below we protected our faucet cartridge with a cup and scrap styrofoam after a bit of a mishap! You can also purchase these foam faucet covers). But, lesson learned, always protect the shower cartridge!!!
2. Measure your shower walls to determine how large to cut your PROVA BOARD PLUS+ sheets. Be sure to measure where pipes protrude for the shower faucet fittings as well. Once measured, use a straight edge such as a carpenter's square or yard stick to measure and mark lines for cutting. We measured with a tape measurer and then lined up a carpenter's square along the markings to draw a straight line for cutting.
3. Cut the PROVA BOARD PLUS+ along the line you drew using a box knife. PROVA board is really easy to score with a box knife. It will take a few passes with the knife to get all the way through the board.
4. Measure and mark any areas for pipes (shower head, handles, etc.). We used a hole saw to quickly cut out these areas, but again, PROVA BOARD PLUS+ is super easy to cut, so you could also use the box knife again.
5. Do a test run and dry fit your boards to make sure your cuts are all accurate. Make adjustments as needed.
6. Now you're going to install the boards using PROVA-SEAL. PROVA-SEALis a hybrid silicone, waterproof sealant. It dries super fast and is cured within an hour! It's also waterproof, crack proof, and flexible. My favorite part is that it's low VOC, which made it safer for me to be around during pregnancy!
Going one section at a time, apply PROVA-SEALto the studs using a caulk gun. Only cover a section as large as one cut board; remember, this stuff dries fast! You'll also apply PROVA-SEAL along the top edges in between sheets of PROVA board. Once a section has PROVA-SEAL applied, press the PROVA BOARD PLUS+ against the studs.
7. Secure the board to the studs using PROVA FASTENERS. We used a drill to install them. They should be placed 12 inches apart.
Continue this pattern of seal >> board >> fasteners until all sections of PROVA BOARD PLUS+ have been completed.
8. Now run PROVA-SEAL along all joints and seams of the PROVA BOARD PLUS+. It should cover all corners and gaps between the boards. Also cover the PROVA FASTENERS with PROVA-SEAL. Smooth out the seal using a putty knife.
Now your shower is prepped and ready for tile! The best part is you have absolutely no reason to ever worry about mold or water damage! After the mess we went through with our old shower, I am so thrilled to know that nothing funky is growing behind the tile!
Ready for the next step? Tomorrow, we're learning how to install tile in the shower!
Want to see the final bathroom makeover? Check out the full reveal!


This stuff sounds so amazing! Definitely the way to go for waterproofing!
ReplyDeleteThis is so helpful! We are wanting to re-do our bathroom shower sometime soon, but I'm terrified of doing it wrong and ending up with scary mold behind the tiles. This looks like the perfect preventative! Thanks for the great tutorial!
ReplyDeleteThis sounds so easy to work with! Will definitely be keeping this in mind for our next bathroom reno!
ReplyDelete