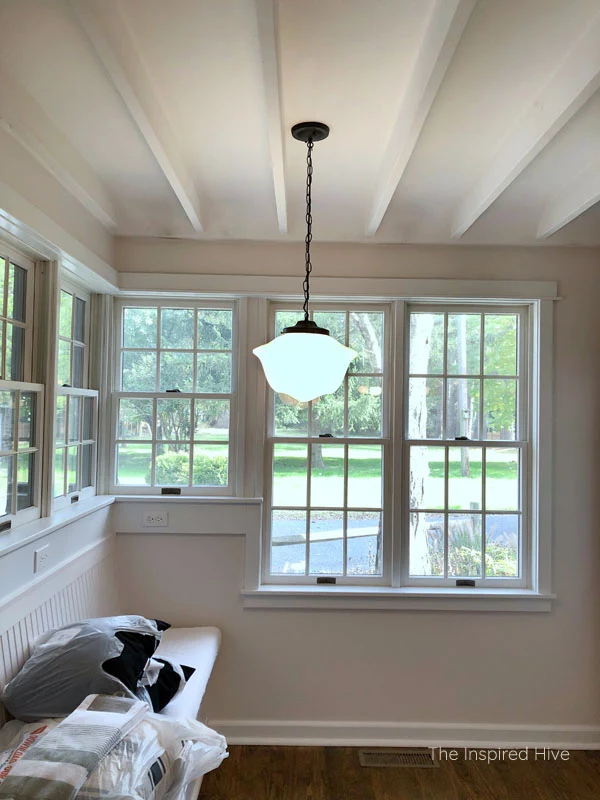
Week five ORC update and schoolhouse light inspiration
I'm not quite sure how we are already at week five of the One Room Challenge, but here we are. We have just one week left to wrap everything up and get to the finish line. Almost all of the big projects are checked off of the list, so I'm heading into the last week feeling confident that everything will fall into place. It's always the most stressful week of course, but even if there are things still left undone, we will still have a freshly updated space that feels more like home.
I am honored to be collaborating with Sherwin-Williams , Kingston Brass, and D. Lawless Hardware on this project. As always, I only promote brands that I love and think you will too.
This post contains affiliate links for your convenience. For more information, see my disclosure policy.
This post contains affiliate links for your convenience. For more information, see my disclosure policy.
You might also love...
- Vintage farmhouse kitchen design plan
- DIY Farmhouse breakfast table
- Vintage kitchen faucet inspiration
Week five progress
This week we chipped away at a lot of little things that were left. Many were not exciting- like finishing the cutting in around the ceiling and painting floor mouldings. Others were more fun, like installing our small section of open shelving.
We bought corbels and 12" wide boards from Home Depot and painted them to match the backsplash and cabinets. I used Sherwin-Williams Emerald Urethane Trim Enamel in Incredible White for the backsplash, cabinets, and shelves. I can't believe how much removing just one small section of cabinetry opened up the entire space. It's amazing. I can't wait to show you more.
Above, you can also see another project in the works. See that weird post sticking out the wall? It's an enclosure for a radiant heat pipe. We can't move it without a whole lotta time and money, so I came up with the idea of wrapping it with a faux wood beam!
That square sitting in front of it is the sample of the wood beam. I ordered from Architectural Depot and I have to be honest- it's been a terrible experience. It was twenty days before my order even shipped and customer service was unresponsive. I just finally got a notification yesterday that it shipped. It's going to get here Tuesday... and still has to be cut and installed... and the reveal goes live Wednesday night. 😳
No big deal. Everything is fine. Right?! Ahhhh!
I'm nervous that it won't arrive on time... so that roll sitting on the counter is a sheet of wood grain wall paper just in case I need a temporary solution. Let's all cross our fingers.
Anyway, the beam itself is made by Ekena Millwork and the sample is beautiful, so I'm really excited about it, but if you are ever looking into installing faux beams, order directly from Ekena Millwork or from Home Depot. I am not recommending the distributor that I ordered from.
We also worked on installing all of our cabinet hardware this week. The antique brass cup pulls from D. Lawless Hardware look amazing against the green paint and they're a great match for the faucet we installed last week.
Our biggest focus this week was lighting. We hung my antique schoolhouse light. I am in love. 😍
The shade is an authentic milkglass shade from the early 1900s. I found it on eBay
Then I realized how hard it is to find a fixture with a fitter for a large shade like this. It's not a standard size today! Then I found Lamp Goods on Etsy. They make their own lighting and carry a large schoolhouse fixture with the same size fitter I needed. I asked if they could do a custom order and make just the fixture for me since I already had a shade. And those amazing wonderful people did it! 🙌
So basically, I got a giant gorgeous schoolhouse light fixture to hang above my kitchen table for wayyyy cheaper than you can buy them elsewhere. Happy girl right here!
(Also note the piles of decor I've bought for this room are starting to accumulate! 😂 )
I also gave our pendant lights a little update as another budget friendly lighting hack. I'll do a more in depth post on this soon, but all I did was spray paint the fixtures black and swap out the seeded glass shades for mini opal schoolhouse shades that I found for $5 each!
There are some things worth splurging on when redesigning a room, but when it comes to lighting, I can usually find a way to get what I'm looking for on a budget. However, if you have a larger lighting budget or your just not up for DIYing your lights, I've rounded up some beautiful schoolhouse fixtures for you below!
Vintage style schoolhouse light fixtures
Our kitchen makeover to do list
Paint the walls✔Paint the cabinets✔Install new cabinet hardware✔Install a painted v-groove backsplash✔Paint countertop shelf/ledge✔Remove glass cabinet✔Add open shelving for Sophie Conran dish collection✔- Wrap radiant water pipe enclosure with faux wood beam
Build new table for breakfast nook✔Buy new chairs for breakfast nook✔Install new light fixture above table✔Update pendant lights above bar✔Install new vintage inspired faucet✔- Replace reverse osmosis filtration faucet
Buy new bar stools✔Paint the doors and update door hardware✔Create coffee nook with peg rail mug rack✔- Find artwork and wall decor
Change all electrical outlets and light switches to white (or black on the countertop)✔
Big thanks to our One Room Challenge sponsors!
This is the last sneak peek I am sharing on the blog. Come back next week for the final reveal!!! Be sure to stop by the One Room Challenge blog to see how everyone else is doing in the final week!


Looking beautiful! Those schoolhouse lights seem just PERFECT in your space and so cool that that one is antique!!!
ReplyDelete