Happy Monthly DIY Challenge day!! Woohoo! This month we are tackling something in every true crafter's supply collection... Modpodge!!! Modpodge seriously has so many uses. The possibilities are endless! That's why this month's challenge is so much fun. We've come up with 12 totally different project ideas!
If you're not familiar with our challenge, you can read more about it here.
Big thanks to Plaid for providing Modpodge for this challenge.
I gave them both a good wipe down with rubbing alcohol and a cotton ball to remove any residue or oils from my fingers that might prevent the Modpodge from sticking well. After cleaning them, I avoided touching the surface to keep them clean.
Next, I gathered my supplies. Since these would be going in a bathroom, I wanted them to be able to withstand moisture, so I decided to use dishwasher safe Modpodge. There is also an outdoor Modpodge which would probably work just as well in a bathroom environment.
I found these cute navy blue nautical prints with a map background on Etsy. I printed them out in sizes that would fit the bath accessories (one was wallet size and one was 4" x 6" that I trimmed down). I used a sponge brush to apply Modpodge onto the ceramic only in the area I planned to place the nautical print. Then, I placed the print on top of the wet Modpodge area. I smoothed out any bubbles with my finger.
Once positioned correctly, I used the sponge brush to apply a layer of Modpodge on top of the print. I applied a total of three coats on top, allowing it to dry between coats.
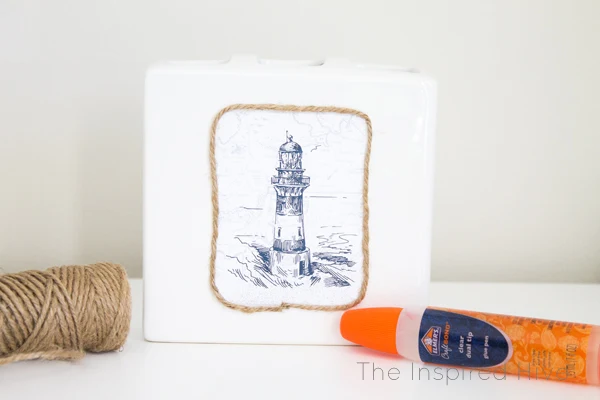
I decided I needed a little something else, so I added some twine to hide the edges of the print. I used this glue to draw a line of glue around the edge, and then added the twine, pressing and holding it as I went. I tried several different glues in my stash, and this one held the best!
I'm so happy with how cute they turned out! And they cost so much less than anything I could find in stores which I didn't love nearly as much. So glad I didn't just settle for something else!
As a special thanks to our readers, this month we're giving away a $50 giftcard to Plaid and a product package worth $100!!! Enter using the widget below for a chance to win! If you're not familiar with our challenge, you can read more about it here.
Big thanks to Plaid for providing Modpodge for this challenge.
This post contains affiliate links for your convenience. For more information, see my disclosure policy.
We recently made over our son's nautical bathroom, so I brainstormed a way to incorporate Modpodge into that. I had a lot of trouble finding a toothbrush holder and soap dispenser that I liked, so I decided to create my own! It was super easy and quick, and now I have bathroom accessories that match the rest of the decor perfectly!
Materials:
- Ceramic bath accessories (toothbrush holder | soap dispenser)
- Rubbing alcohol
- Sponge brush
- Printed design of your choice (I used these nautical prints)
- Dishwasher safe Modpodge
- Twine
- Glue (Craftbond)
How to decorate your own bathroom accessories:
I searched online for a plain white ceramic bathroom set and decided on this white toothbrush holder and soap dispenser on Amazon.I gave them both a good wipe down with rubbing alcohol and a cotton ball to remove any residue or oils from my fingers that might prevent the Modpodge from sticking well. After cleaning them, I avoided touching the surface to keep them clean.
Next, I gathered my supplies. Since these would be going in a bathroom, I wanted them to be able to withstand moisture, so I decided to use dishwasher safe Modpodge. There is also an outdoor Modpodge which would probably work just as well in a bathroom environment.
I found these cute navy blue nautical prints with a map background on Etsy. I printed them out in sizes that would fit the bath accessories (one was wallet size and one was 4" x 6" that I trimmed down). I used a sponge brush to apply Modpodge onto the ceramic only in the area I planned to place the nautical print. Then, I placed the print on top of the wet Modpodge area. I smoothed out any bubbles with my finger.
Once positioned correctly, I used the sponge brush to apply a layer of Modpodge on top of the print. I applied a total of three coats on top, allowing it to dry between coats.
I decided I needed a little something else, so I added some twine to hide the edges of the print. I used this glue to draw a line of glue around the edge, and then added the twine, pressing and holding it as I went. I tried several different glues in my stash, and this one held the best!
I'm so happy with how cute they turned out! And they cost so much less than anything I could find in stores which I didn't love nearly as much. So glad I didn't just settle for something else!
Check out 11 other amazing Modpodge ideas:
Love this project? My friends have come up with some other awesome ways to use Modpodge. Check them out below!Win a prize package!
a Rafflecopter giveaway
Thanks for stopping by! We hope to see you again for next month's challenge on the second Wednesday of the month!

*This post may contain affiliate links. See my full disclosure policy.


SO creative Nicole! They looks so sweet in your new bathroom space!
ReplyDeleteThanks, Kristi! We are loving the new look!
DeleteOh these are the cutest! Love how they coordinate. What a great way to give plain bathroom accessories some life! That twine is the perfect finishing touch
ReplyDeleteI agree.. so yay! <3
Delete~Diane@Haus
Thanks, Erica! They needed a little something, and the twine worked out perfectly!
DeleteThis is such a fantastic way to customize those bathroom accessories, Nicole! I spotted them in your bathroom makeover post and wondered if you had made them! And voila - here they are! SO cute!
ReplyDeleteThanks, Bre! And good catch spying them in my previous post! ;)
DeleteThis is such a cool idea! I love how it turned out!
ReplyDeleteThanks, friend! :)
DeleteSo creative! Love the nautical style :)
ReplyDeleteThanks, Erin! Sometimes I have to pretend I live somewhere coastal ;)
DeleteThese are perfect for C's bathroom, Nicole! I really like the prints you found and how you framed them with twine. To cute!!
ReplyDeleteThanks so much, Amy!! Hopefully he'll like boats when he gets bigger! He's stuck with them now! :)
Deletenice post . Some really helpful information in there, Bookmarked. Nice to see your site. Thanks! harneymfg
ReplyDelete