Ahhhhh! We're already in week two of the One Room Challenge! Why is it that as soon as the first week goes by it feels like it's crunch time?! Calm down, Nicole, there's still plenty of time to get things done... right???!!
If you're just joining, my husband and I are giving our master bathroom an overhaul! You can see the
before pics and our design plan in the first post. We thought we were just doing a simple, quick update, but you know how that goes... 😂
This post is sponsored by M-D Building Products. As always, I only recommend brands I love and think you'll love too!
This post may also contain affiliate links for your convenience. For more information, see my disclosure policy.
This week's focus was mostly on demo. We were super excited to get to say "It's demo day!" and pretend we were on Fixer Upper. Tearing everything out sounds easy enough, but as with all room renovations, we were bound to hit a few snags along the way. Thankfully nothing that slowed us down too much, but still frustrating!
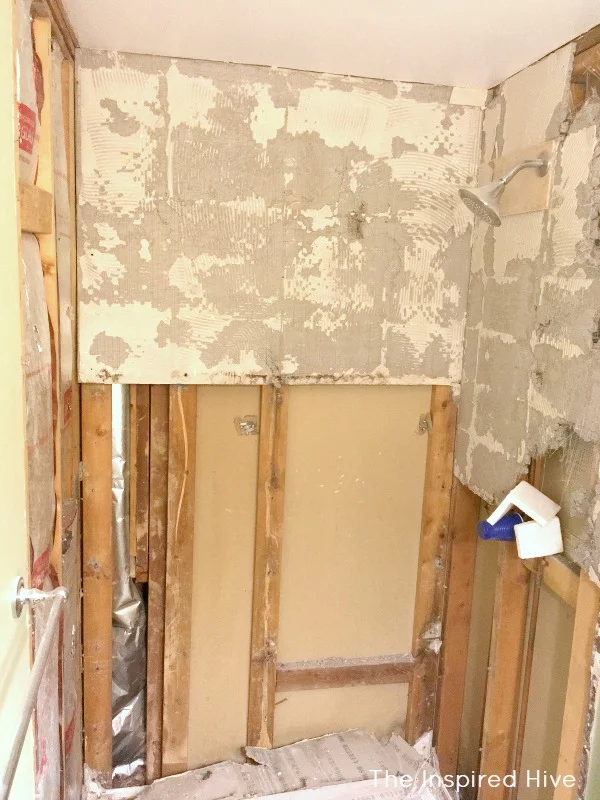
We tore all of the tile and old cement board out of the shower. That took a bit longer than we anticipated of course. A hammer, pry bar, and some thick gloves is all you need, but it's a tedious job! When we were done, we had several very heavy boxes of tile to dispose of and a big dusty mess to clean up! Luckily, we thought ahead a little and put some old towels down to protect our shower pan. Our biggest snag on this part was a falling piece of tile knocking loose the old shower cartridge (the piece behind the handle that controls the water flow). Oopsy. It started leaking of course. Thankfully, the Home Depot down the street had the replacement part in stock, but it meant having the water to the whole house turned off for a while and an unnecessary delay. The rest of the time, we have kept a piece of styrofoam over the valve to protect it from any more potential accidents.

Next came the vanity, countertop, and backsplash. Prying the backsplash tiles off was pretty quick and easy. We decided beforehand that we were going to install beadboard so that we wouldn't have to worry about repairing the drywall underneath the old backsplash, and I am so glad we had already made that decision! Once we got everything out, we saw what a mess it really was back there. Every time we remove things in this house, what we find behind the walls is scary! Check out the awful patch job the previous homeowner did...
There are big giant gaps! Did they just not see them? That's not even the worst of it. I don't have a photo because the angle in this tiny space is tough, but to the left in the corner there was a huge gap in the drywall where there were electrical wires looped through. Not to code at all and very dangerous! So, we had to tackle that little issue before moving on.
Removing the vanity was a bit of a nightmare too. It's hard to explain, but basically the way the previous owner installed the vanity was in the way of how the quarter turn valves should normally be installed. We tried just removing the water inflow tubing, but unfortunately that resulted in another leak and the water being turned off for a bit again! We ended up having to actually cut the back of the vanity around each pipe in order to remove it. Thankfully, one of my husband's good friends is a contractor, so he came to save the day and replaced our entire set of quarter turn valves. We take on a lot of renovation challenges around here and try to learn everything we can to be able to do things on our own, but plumbing is certainly not our specialty and this guy has saved our butts a few times on different projects, not to mention all of the other handy tips we've learned from him along the way. We're so thankful to have him around!
Once we got past repairing all of the disasters, it felt so good to step back and see all of that hideous ivy tile GONE! And no more awkward countertop hiding the toilet! The bathroom felt bigger and brighter instantly!
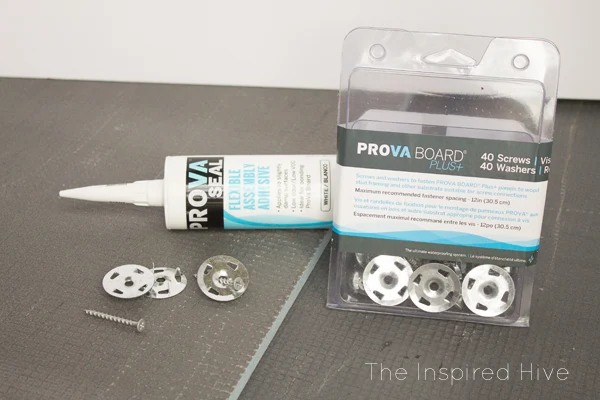
In between the demolition chaos, we worked on installing the new tile backer board for the shower. This was super easy to do, so we were able to chip away at it a little at a time in between fixing our plumbing and electric issues. We used PROVA BOARD PLUS+ which is a great alternative to cement backer board. It's super lightweight in comparison and is made of an extruded polystyrene core with mesh reinforcement and cementious outside coating. Blah, blah, blah, what the heck does all of that mean?!?! In short, this stuff is waterproof, vapor proof, and structurally sound! Sounds like exactly what we need after the mess we dealt with in the old shower!

After watching the installation video on the PROVA website I knew it would be easy to install, but I was really impressed with how quick it actually was! It was really easy to cut to size with a utility knife. Then it just goes up with some special PROVA FASTENERS and PROVA-seal which is a caulk-like, hybrid silicone, waterproof seal. The PROVA-Seal is also low VOC which is great since we're working on this project while I'm seven months pregnant!!!
I always give my husband a hard time about his messy caulking skills, which you can check out below 😉 But look how cool this PROVA stuff is!!! We now have a great surface to start with for tiling our shower!
If you're interested in learning more about the PROVA BOARD PLUS+, I'll be doing a full installation tutorial soon, so stay tuned! In the meantime, can we just admire how fantastic our shower looks without all that gross, moldy, decaying, ivy tile? I'm so excited to have a surface that won't promote mold and mildew growth. Those days are overrrrrrr.
So what's left on the agenda?? Here's our updated to do list....
Remove tile backsplashRemove countertop and vanity- Install beadboard
- Install new vanity and sink faucet
Remove glass shower doorRemove shower tile and old cement boardInstall PROVA BOARD PLUS+- Install new subway tile and grout
- Remove tile wall moldings
- Install and paint wooden floor moldings/trim
- Update floor grout color
- Paint walls
- Update light fixture
- Accessorize
Okay, so maybe we've accomplished more than I thought! Next, we're focusing on installing the beadboard and new vanity and on installing the new tile in the shower. Check in next week to see how far we get! Don't forget to visit our One Room Challenge host,
Calling It Home, to see the rest of the projects going on! You can also follow #oneroomchallenge on Instagram to see tons of sneak peeks!
Big thanks to our sponsors! This project has been so much easier thanks to their awesome products!


You did so much! I commend you for taking that on, we'd never find the time!! Can't wait to see next week's project!
ReplyDeleteYay for progress! That PROVA board sounds amazing!
ReplyDeleteWoohoo you got SO much done!! I bet all that demo being done feels so good! We are going to do our bathroom soon so I'll definitely check out your video on using Prova :)
ReplyDeleteLooks like you guys are off to a great start!
ReplyDeleteWow! You really made a good dent in your to-do list. Isn't it the best feeling when you have a clean slate to work with. Looking forward to seeing the tile in place :)
ReplyDeleteSo neat! We want to redo our tub and shower area soon (hopefully this summer) and I don't know much about tiling. I will be waiting for your tutorial! P.S. I am redoing my kitchen at 7 months pregnant too!! Needless to say I have had a ton of help since I wasn't able to paint. :)
ReplyDeleteLove seeing your progress. The Prova boards look amazing. I have a bath makeover coming up so I'll stay close to learn all that I can. Thanks for sharing. Susie from The Chelsea Project
ReplyDeleteDemo is so much fun! I can't believe how much progress you've made in one week, can't wait to see what you do in that shower!
ReplyDeleteWow you are making great progress. I can't wait to see what you do this week.
ReplyDelete